How to Use a Vue.js Event Bus

Note: This guide only applies to Vue 2. Vue 3 dropped support for event busses as outlined here. I will be working on a blog post on how to use an external library for this shortly.
The Problem
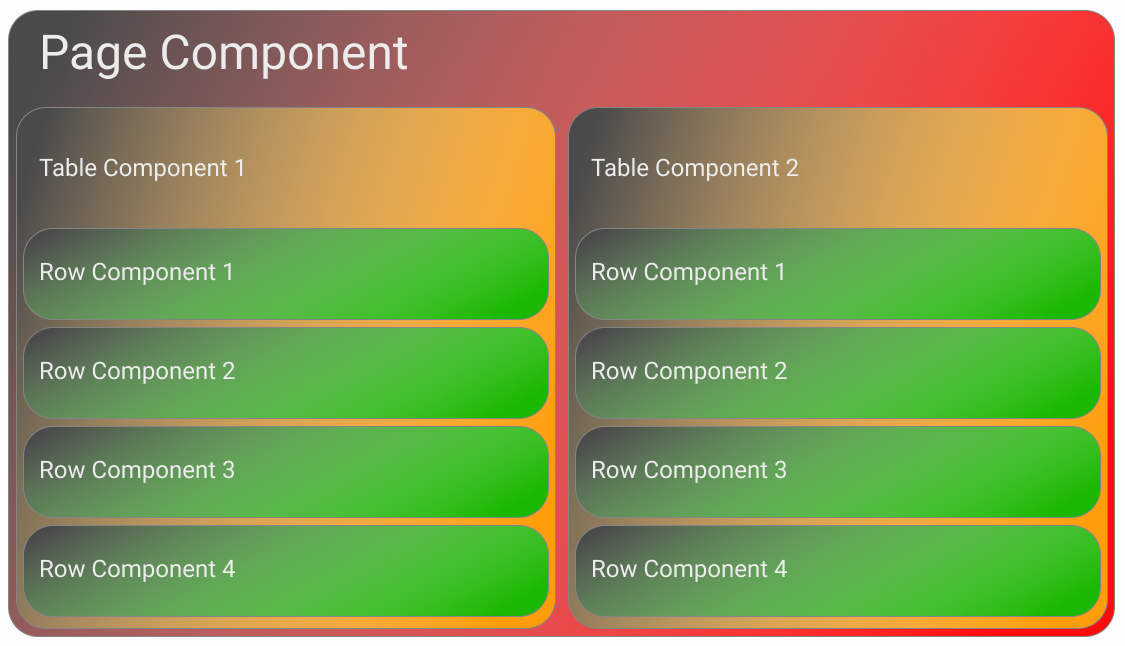
In Vue, sometimes there is a need to pass data between two components that are part of separate trees in the component hierarchy, for example there may be two tables on a page, and when one a user edits data in one table, data in the other must update. The table rows are part of two separate component trees. This may be what the component tree looks like:

The Solution
How would the row component on the left communicate with a row component on the right? Normally we would pass an event from the row, up to the table, and then to the page and then back down into the table on the right and then finally the row component on the right, but it need not be this complicated. That’s where event busses come in. They provide a conduit for passing events from one component directly to another. In fact, with an event bus, there can be multiple senders and multiple receivers. This lets you use event busses in a publisher/subscriber model.
How do we make it happen?
I’ll be using the Vue.js Single File component syntax. If you have never seen this before, I would highly recommend you check out this portion of the Vue.js documentation. I’ll also be using TypeScript to add type checking as I feel that even in examples it’s good practice to have static type checking as it makes some of the intent more clear.
The Event Bus
The first piece of the puzzle is the event bus itself. Here we simply instantiate a new Vue instance, and here we also declare an enum. If you’ve never seen an enum before it’s simply a type-safe way of defining a set of constant values, in this case a string. They are only available in type safe languages like TypeScript. We can have multiple event types fired from a single event bus so we can declare those other types in that enum if we need to. This is what the event bus declaration looks like:
// myEventBus.ts

import Vue from 'vue';

export enum MyEventBusEvents {
  MyTestEvent = 'my_test_event',
}

export const myEventBus = new Vue();
Here we import vue, declare our event types and then instantiate a new Vue instance. This is all we need to do to create a new event bus.
The Sender
The sender is the component that emits events and sends them into the event bus. There may be multiple senders that publish events. The component looks like this:
<!-- Sender.vue -->
<template>
  <div>
    <button @click="emitEventBusEvent">
      Fire Sender
    </button>
  </div>
</template>

<script lang="ts">
  import Vue from 'vue';
  import { myEventBus, MyEventBusEvents } from './myEventBus';

  export default Vue.extend({
    methods: {
      emitEventBusEvent() {
        myEventBus.$emit(MyEventBusEvents.MyTestEvent, 'Hello World 1!');
      },
    },
  });
</script>
We have a button in our template that has an event handler in our methods component. Then in our script tag, we import the event bus and our enum. In our emitEventBusEvent method we can fire an event (simillar to how a component would) by calling the $emit() method. The first parameter is our enum value, which is a string. Any parameters after this, are data parameters. They will be passed through the event bus to the listening components.
The Receiver
The receiver component is the component that subscribes to events published by the Sender (or any other component attached to the event bus). The receiver must subscribe in the created() hook that Vue provides as way to run code when an instance of the component is created. The receiver looks something like this:
<!-- Receiver.vue -->
<template
  >f
  <div>
    {{ myField }}
  </div>
</template>

<script lang="ts">
  import Vue from 'vue';
  import { myEventBus, MyEventBusEvents } from './testEventBus';

  export default Vue.extend({
    data: () => ({
      myField: 'Not Fired Event Yet',
    }),
    created() {
      myEventBus.$on(MyEventBusEvents.MyTestEvent, (text: string) =>
        this.eventFired(text)
      );
    },
    methods: {
      eventFired(text: string) {
        this.myField = text;
      },
    },
  });
</script>
Now, when the event fires in the bus, we have an arrow function that will be called and then call our eventFired method, changing the text to whatever the event bus sent. It’s worth noting that just like there can be more than one listener there can also be more than one subscriber, so multiple types of components, and multiple instances of those types will all receive the events.
Conclusion
Now we have a working example of how an event bus works. Event busses are a useful feature for passing data between arbitrary components in the same application.

Written by Ben Brougher who lives and works in the Pacific Northwest developing solutions to problems (usually with software). He graduated 2020 from Eastern Washington University as a Computer Science Major, Bachelor of Science (BS), and works engineering and developing software solutions in the enterprise telecommunications industry.